NinjaTrader Multiple Data Series: Chart and Indicator Setup
Add instruments or intervals to one NinjaTrader 8 chart, choose each indicator's input series, and check panels, time alignment and order-entry scope.
On this page
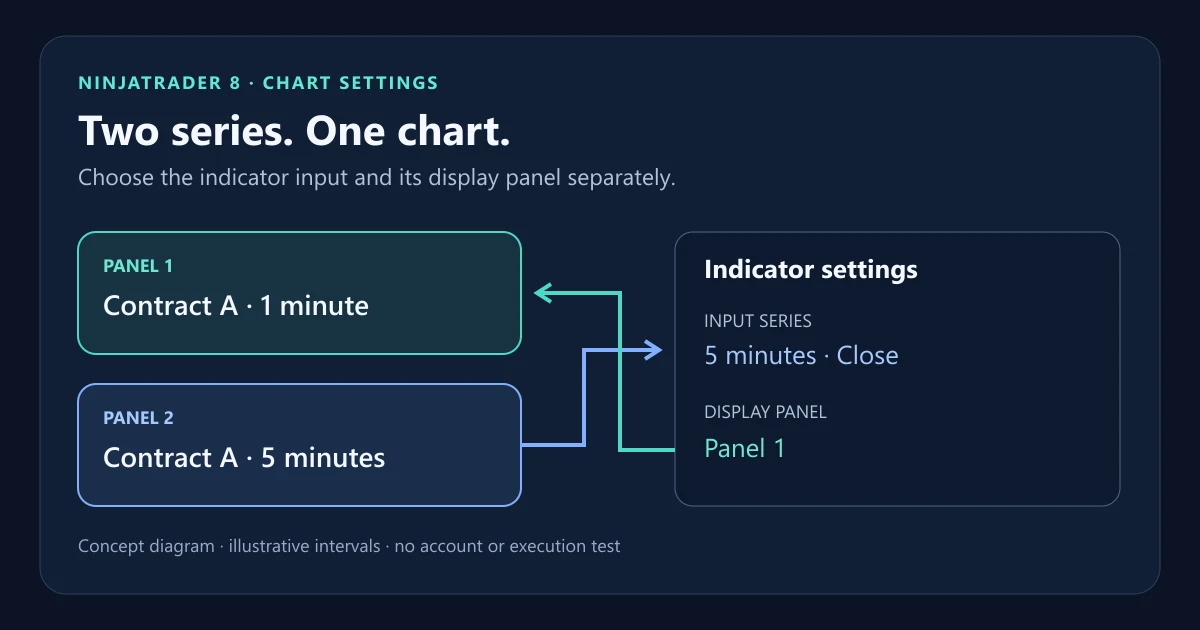
To add another instrument or interval to an existing NinjaTrader 8 chart, open Data Series and add it to the Applied list. Then check each indicator’s Input Series: putting an indicator beside a price series does not establish which data it calculates from.
NinjaTrader’s multi-series chart reference describes several series within one chart window. For example, you can display the same futures contract as one-minute and five-minute bars. The intervals illustrate the controls; they are not trading recommendations.
Add and configure each series
Use the Data Series controls on an existing chart:
- Right-click the chart background and select Data Series.
- Use the instrument selector or its search control to add an instrument. Check the futures contract month; the symbol lookup guide helps identify the intended contract.
- Select the new entry under Applied before editing its properties.
- Set Type and Value for its bar interval. Inspect Price based on, Trading Hours and the historical range under Load data based on.
- Apply the changes, reopen the dialog and confirm the settings of each entry separately.
For two intervals of the same contract, add that contract again and give the second entry its own interval. The tick-versus-time guide explains how the bar types differ.
A chart template can replace manually chosen series settings. Use the chart-template guide to match the source and target series counts, then recheck the applied configuration after loading.
Keep placement separate from calculation
Start with separate panels so each series and price scale is easy to identify. NinjaTrader places an added series in a new panel unless you choose an existing panel.
| Setting | What it controls |
|---|---|
| Data Series: Panel | Where that price series appears. |
| Indicator: Input Series | The series and price value used for the indicator’s calculations. |
| Indicator: Panel | Where the indicator’s plot appears. |
The Data Series properties also let you choose a left, right or overlay scale. Inspect Scale justification when several objects share a panel; do not read a plot against an unrelated price axis.
For bar-width or spacing adjustments, select the intended series first. NinjaTrader applies those adjustments to the primary series when none is selected.
Set the indicator input explicitly
Right-click the chart background and open Indicators. Select the indicator under Configured, then click its Input Series field. Choose the intended applied series and price value, such as its close. NinjaTrader documents this in Working with Indicators.
Set Panel separately. Choosing Same as input series keeps its placement linked to the input’s panel. A custom NinjaScript indicator must be implemented to use the selectable input; check its documentation rather than assuming every custom script follows a changed field.
Use the Data Box to inspect the result. Open it from the chart context menu or the default Ctrl+D shortcut, then move the pointer over a bar. It lists series and indicators by panel, and indicator timestamps identify the input bar time. Items with Display in Data Box disabled are omitted.
For example, an indicator drawn in panel one can calculate from the five-minute series in panel two. Its timestamp helps distinguish that input from the one-minute bars beside the plot.
For the full add, configure and remove workflow, see chart indicators and calculation modes. It explains when updates occur and how to compare values on the same bar.
Check the shared time axis and order destination
The primary series determines multi-series bar spacing and is usually the first series added. To change it, right-click the intended series’ bars and choose Set as Primary.
When series use different Trading Hours templates, the chart’s time axis spans the earliest session start and latest session end among them. This does not make their individual sessions identical. Compare the Trading Hours settings when one series has no bars during part of the displayed range.
If Chart Trader is enabled, check its account and instrument selectors independently. NinjaTrader’s order-display reference says its orders and positions belong to the selected account and instrument; on a multi-instrument chart, its instrument selection also determines what the controls act on. Use the Chart Trader guide before order entry.
PropFirmConnector connects any Rithmic account to NinjaTrader 8. Use the connection directory for setup. PropFirmConnector supplies connections; chart configuration belongs to NinjaTrader, and copying orders requires a separate copier.
Documentation reviewed November 10, 2026. The diagram explains settings; it is not a platform screenshot or evidence of an account or execution test.
PropFirmConnector publishes this article and sells the Rithmic connection add-on described on this site.